

Written by fabio
Apache Syncope can manage users, groups and memberships (memberOf/member attribute) on external Active Directory via ConnId's Active Directory (JNDI) connector. Think you manage users and roles on Apache Syncope as centralized IdM, and have all these entities automatically kept in sync with your Active Directory users and groups: few simple steps onto the Apache Syncope administration console will help you to succesfully aim your goals ....
Step 1: Add your custom synchronization action to synchronize memberships
Memberships won't be synchronized without adding an ad-hoc synchronization action.
The simplest way to implement your sync action is to extend org.apache.syncope.core.sync.impl.LDAPMembershipSyncActions by overriding getGroupMembershipAttrName() method.
This method have to be returned the value of the connector configuration property groupMemberReferenceAttribute.
See the sample below.
              protected String getGroupMembershipAttrName(
              final Connector connector) {
              final ConnInstance instance =
              connector.getActiveConnInstance();
              final Iterator<ConnConfProperty> itor =
              instance.getConfiguration().iterator();

              String name = null;

              while (name == null && itor.hasNext()) {
              final ConnConfProperty prop = itor.next();
              final String sc = prop.getSchema().getName();

              if ("groupMemberReferenceAttribute"
              .equals(sc)
                && prop.getValues() != null
                && !prop.getValues().isEmpty()) {
              name = (String) prop.getValues().get(0);
              }
              }

              return name == null ? "member" : name;
              }
Step 2: Create and configure your Active Directory connector instance
Apache Syncope 1.1.5 comes with ConnId Active Directory (JNDI) connector bundle 1.1.1. Since this version doesn't support group management you have to download org.connid.bundles.ad-1.1.2.jar (strongly recommended) and install it into your bundles location.
Go under Resources > Connectors and click the Create new connector button on bottom: a window will appear.
Set the name you like as Display name, choose the Location where your Active Directory (JNDI) connector bundle is.
Then move to the Configuration tab and configure your connector instance (see below a complete example).
| SSL | true |
| Server hostname | teak.tirasa.net |
| Server port | 636 |
| Principal | pocadmin@tirasa.net |
| Principal password | password |
| Base contexts for user entry searches | CN=Users,DC=tirasa,DC=net |
| Base contexts for group entry searches | CN=Users,DC=tirasa,DC=net |
| Default people container | CN=Users,DC=tirasa,DC=net |
| Default group container | CN=Users,DC=tirasa,DC=net |
| Entry object classes |
top |
| Root suffixes | DC=tirasa,DC=net |
| Object classes to synchronize | user |
| Retrieve deleted users | true |
| Retrieve deleted groups | true |
| Trust all certs | true |
| Null token is the latest | true |
Next, move to the Capabilities tab and check everything.
Finally click the Save button.
Step 3: Configure your Active Directory external resource
Move back to the Resources tab and click the Create new resource button on bottom: a window will appear.
Set the name you like and choose the Connector created in the step above.
Select Propagation mode ONE_PHASE.
Select Propagation primary.
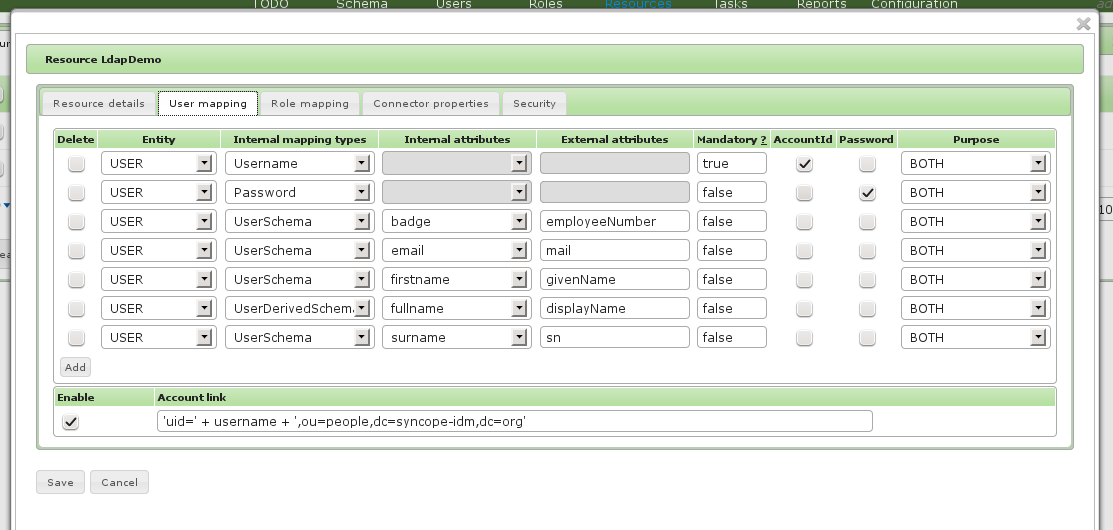
Configure mappigs (User mapping) between syncope user profile attributes and Active Directory user profile attributes.
Configure mappigs (Role mapping) between syncope role profile attributes and Active Directory group profile attributes.
After setting user and role mappings (see above for an example) click the Save button.
User mapping sample
You may need to define some attribute schema on Apache Syncope before being able to complete the configuration below.

Role mapping sample

Step 4: Propagation testing
With configuration above Apache Syncope is fully enabled to manage users and roles on Active Directory:
Step 5: Synchronization testing
Some additional configuration is needed for enabling synchronization, e.g. ability to pull data from external Active Directory.
Go under Tasks > Synchronization Tasks and and click the Create new task button on bottom: a window will appear.
Set name and description you like more.
Specify Actions class provided at the step 1.
After flagging any checkbox (check Full reconciliation if and only if you want to perform a full reconciliation), click the Save button.
At this point Apache Syncope is fully enabled to manage users and groups from Active Directory.
IMPORTANT: if you are not performing a full reconciliation, execute once the Synchronization Task created above in order to initialize the latestSyncToken at the current date.
Create some sample users and groups in Active Directory, then go back to Apache Syncope admin console and execute again the Synchronization Task created above: you will find both users, roles and memberships in Apache Syncope, created according to data provided in Active Directory.


